×
Menu
Index

On Board Logging Sessions Window

On Board Logging Sessions Window
1

Session List

1. Session List
 
2

Reload On Board Logging Data

2. Reload On Board Logging Data
This will reload all session data from the KTunerECU unit.
3

Download Currently Selected Session

3. Download Currently Selected Session
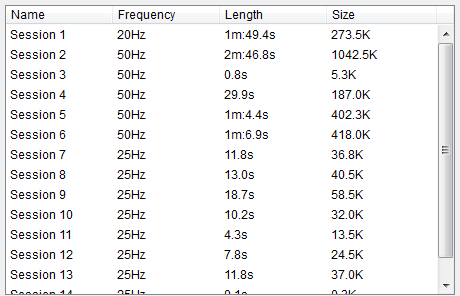
This will download the currently selected logging session and load it into the software for review, graphing, and playback. The main window progress bar at the bottom left corner will display the download percentage during the download.
4

Erase All On Board Logging Sessions

4. Erase All On Board Logging Sessions
For the KTunerECU Revision 1 hardware a full erase can take up to 2 minutes. You can continue to use the software during this process, but on board logging will not be operational until the erase has completed. It's best to allow this to fully complete before removing power to the unit or corruption of new recordings may occur. As outlined on the hardware status LEDs topic the Red LED will be on with a flicker until the erase has completed.
5

Settings For On Board Logging

5. Settings For On Board Logging
This will take you to the on board logging section of the unit settings. You can set the logging frequency (Hz) for on board recordings.
6

On Board Information

6. On Board Information
This displays how much data space is currently in use, available, and how many sessions you have recorded so far.
7

Space Used Progress Indicator

7. Space Used Progress Indicator
A visual indication of how much on board logging space is used.